Sam's Microsoft Dynamics 365 Blog

Friday 27 December 2019

Display Employee Directory (Delve/Corporate Directory) Inside SharePoint

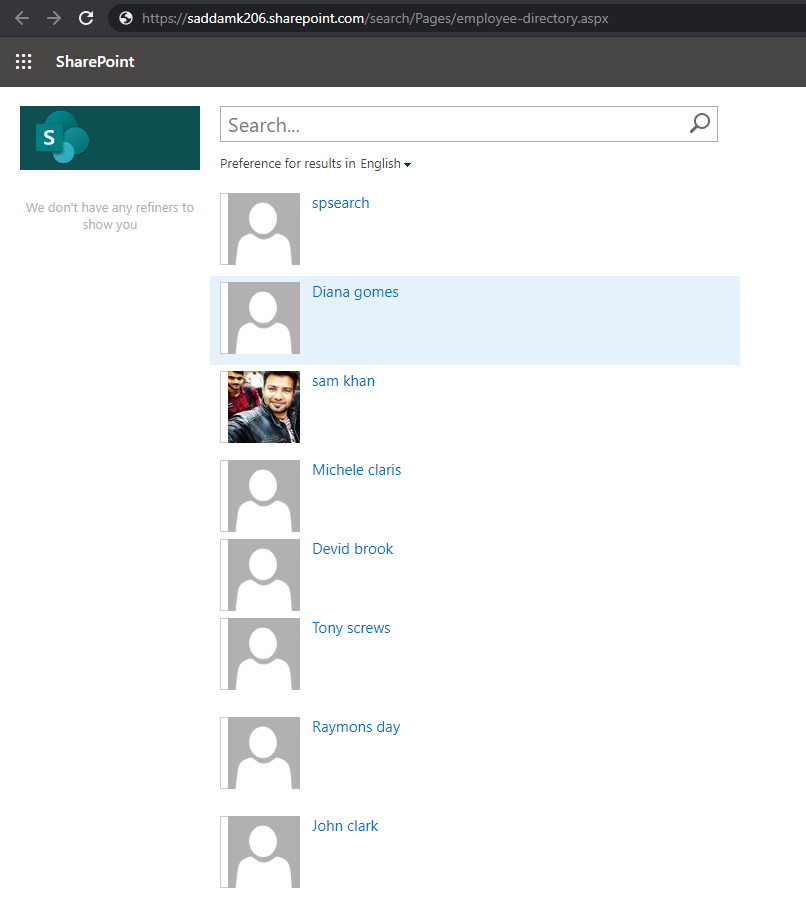
In this article, we will discuss about displaying Employee Directory (Delve/Corporate Directory) in SharePoint.


So, let's discuss step by step: -

1. Open search site of SharePoint. e.g. https://tenant.sharepoint.com/search

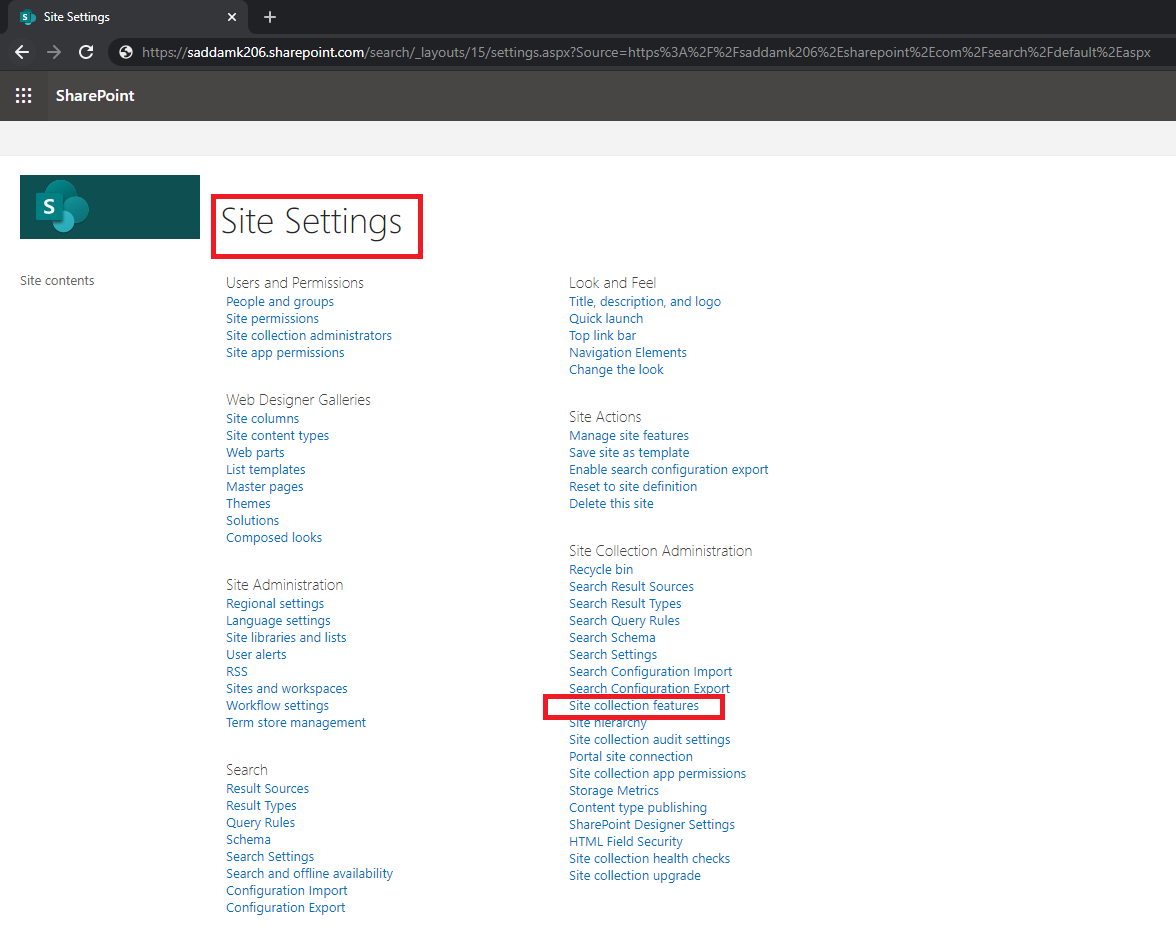
2. Click on Gear Icon and select Site Settings.

3. Click on Site Collection Features.

4. Now enable (Activate): -
    a. SharePoint Server Publishing Infrastructure
    b. Search Server Web Parts and Templates
    c. SharePoint Server Standard Site Collection features


5. Again, open Site Settings and Click on Manage site features.


6. Now enable (Activate): -
    a. Search Config Data Content Types
    b. Search Config Template Feature
    c. SharePoint Server Publishing


7. Click on Site contents.


8. Click on Pages and create a new Welcome page.


9. Now Put a Title and select Page Layout as (Welcome Page) Search People and create it.


10. Open created page.


11. Click on Gear Icon and select the Edit page.


12. Click on dropdown icon inside People Search Core Results and select Edit Web Part.


13. Click on Change query inside Search Criteria inside Properties for Search Results.


14. Put below query inside the Query text box and Click on the Test query.

{searchboxquery} contentclass = spspeople

15. We can see the result inside SEARCH RESULT PREVIEW.


16. Now click on OK.

17. Select Use a single template to display items inside Display Templates inside Properties for Search Results.


18. Select People Item inside Item Display Template.

19. Now Apply and Save it, Then Check-in and Publish it.

  1. Here Now we can see the Employee Directory (Delve/ Corporate Directory).


Thanks for reading the article. Hope this Article will helpful for you. Cheers!!!


Thursday 12 December 2019

Get Context in Add-in’s of Microsoft teams

In many Business scenarios, we have to create Add-ins for Microsoft Teams. Also, we need to define the Context in this Add-in.  So, in this article, we will discuss about getting Context in Microsoft Teams’ Custom Add-In.

So, let’s discuss Step by step: -

1. I have created a HTML page and adding a script reference of MicrosoftTeams.min.js. With the help of this Script reference, we can get a Context.

2. Now I have added a Script section in my HTML Code and added code for initializing the Context, as shown below.

<p> Hello World! </p>

<script src="https://statics.teams.microsoft.com/sdk/v1.4.2/js/MicrosoftTeams.min.js" crossorigin="anonymous"></script>

<script>
var mycontext;
microsoftTeams.initialize();
microsoftTeams.getContext((context) => mycontext=(context))
console.log(mycontext)
</script>

3. Now I will deploy this code to my domain, and I will add domain URL to my Add-in JSON (manifest.json).

4. After that, I will import my Add-in Package to Microsoft Teams and then open the section where I have added this IFrame.

5. Now I can see in Console (In Chrome browser). Here it is printed a JSON of context. It will look as shown below.


Thanks for reading the article. Hope this Article will helpful for you. Cheers!!!


Friday 29 November 2019

OData in dynamics Portal


In this article, we will discuss OData in Dynamics Portal.  The Dynamics portal has a feature of Open Data Protocol. We can use this feature in our public-facing portals.

What is OData?

OData (Open Data Protocol) is an ISO/IEC approved, OASIS standard that defines a set of best practices for building and consuming REST APIs. It enables creation of REST-based services that allow resources identified using Uniform Resource Locators (URLs) and defined in a data model, to be published and edited by Web clients using simple HTTP messages.
Dynamic CRM mainly uses Windows Communication Foundation (WCF) data services framework to provide OData Endpoint which is nothing but a REST-based data service.

So, let's discuss step by step: -

1. Create an Entity List. I am creating an Entity list of Account with name My accounts.


2. Now Scroll down, there is a tab of OData Feed, enable checkbox and in Setting, section put Entity Type Name, Entity Set Name and Select a View.


3. Now Save it.

Now Let’s test OData: -

<Portal URL>/_odata   - This will give you all Entity list in which we have enabled OData Feeds.


I am putting  <Portal URL>/_odata/<Entity Set Name>  in browser  and can see the Results as below.


Thanks for reading the article. Hope this Article will helpful for you. Cheers!!!


Thursday 28 November 2019

Nested SubGrid in Dynamics 365

A Grid inside Grid (Nested Grid) feature is available in the previous release of Dynamics 365. It is an interesting feature of Microsoft Dynamics CRM. We all know we can use subgrades to show related records on a form. For example, contact related to an account and opportunities related to a Contact. Now I like that I can see opportunities related to a Contact (Contact is also related to current Account) on the account form but wouldn’t be able to view a list of contact related opportunities from the contact grid on the account record. But…But…But after using the Nested Grid, I can see the opportunity inside my Account Form.


So, let's configure Nested Grid step by step: -

1. I have a Contact grid on my Account form.
2. Open Change Properties of Grid and click on the Controls tab.


3. Click on Add Controls.


4. Choose Editable Grid Control as follows and Add.


5. Click on the Nested grid view pencil control in the Editable Grid section.


6. Now Select Entity related to Contact entity in the Data Source section, as I have selected the opportunity entity.
7. After selecting an entity, now select a View.


8. Now click on ok.


Don’t forget to Save and publish it.

After configure it will look like as shown in below screenshot.


Thanks for reading the article. Hope this Article will helpful for you. Cheers!!!

Friday 15 November 2019

Hide the “New Registration” option from Microsoft Dynamics Portal Login Page

In this article we will discuss about “How to Hide the new Registration Option from Microsoft Dynamics Portal Login Page”.


So, let’s start step by step:

Step 1: Navigate to Portals inside Classic View or Navigate to Dynamics 365 Portals App inside UCI View.


Step 2: Go to the “Site Settings” Menu.

Step 3: Now search the record with name “Authentication/Registration/Enabled” and update the Value of the Settings records from “True” to “False”.

         Authentication/Registration/Enabled


Step 4: Restart the portal and hit F5 on the Portal Brower to view the changes.

Thanks for reading the article. Hope this Article will helpful for you. Cheers!!!

Tuesday 15 October 2019

Convert a SharePoint List item to PDF Using Microsoft Flow

In many business scenarios we need to create a PDF file from the record, for example we have created a new record for Sales Order and now we need to generate a PDF document for this Sales Order.

In this article, I will be demonstrating how to Convert a SharePoint List Item to PDF using Microsoft Flow.

Here I have an AllProduct List and I have to create a record document. So, I will use Microsoft flow and create a document newly created record in my AllProduct List.

So let’s create a Microsoft Flow step by step:-

1. Login Microsoft Flow here https://flow.microsoft.com/en-us
2. Click on My flows and then Click on "create from the blank".
3. Select SharePoint and Select a Trigger “When an item is created”.
4. Now Select Site Address and List Name. Here I am Selecting the AllProduct.


5. Add a new step, Select SharePoint and Select an action “Get Items”.
6. Now Select Site Address, List Name and put filter query, e.g. ID eq ID.


7. Add a new step, search “Create HTML Table” and Select an action “Create HTML Table”.
8. Now Select From and Columns. Here I have selected "Automatic", you can select "custom" and manage according to your business requirements.


9. Add a new step, Select OneDrive and Select an action “Create File”.
10. Now Select Folder Path, File Name, and File Content. Put File Content as Output.


11. Add a new step, search “Convert File” and Select an action “Convert File”.
12. Now Select the ID of created HTML file inside File option and Select Target Type as PDF.


13. Add a new step, Select SharePoint and Select an action “Create File”.
14. Now Select Site Address, Folder Path, File Name, and File Content. In File Name don’t forget to add the extension as .pdf.


15. Now Save it.

 Here I have used AllProduct List, so let’s create a new record in AllProduct list.


Now check the run history of Microsoft Flow.


Now check the document library. Here a new file is created in my SharePoint Document Library with name, as I have put the name of Product.


Reference:
https://docs.microsoft.com/en-us/flow/getting-started


Thanks for reading the article. Hope this Article will helpful for you. Cheers!!!

Tuesday 8 October 2019

Using Computer Vision Inside Microsoft Flow(AI in Microsoft Flow)

Microsoft has introduced AI services called “Cognitive services”. There are various services categorized by Vision APIs, Speech APIs, Language APIs, and Search APIs which belong to Cognitive Services. These services can be integrated with many platforms very easily. You can find more about Computer Vision https://azure.microsoft.com/en-in/services/cognitive-services/computer-vision/

In this article, I will be demonstrating how to use the Azure Computer Vision with Microsoft Flow.

Here I am using a scenario, An Image is uploaded to SharePoint Document Library, using Azure Cognitive services image content will be converted in text format and sent the text content via email.

So, let’s start step by step.

1. Generate Cognitive Service API Key and URL:-

First, we must generate the API key for Cognitive Service. So, for that

a. Login into the Azure account.
b. Now In the left navigation, click Create a resource.
c. In Azure Marketplace, select AI + Machine Learning and then click Computer Vision.
d. Enter the required details as shown below and click Create.
e. Click on All Resources in the left navigation and then click the newly created computer vision resource.
f. Now Click Keys under Resource Management, copy the Key.

Note: - It might take a few minutes to deploy the resource.


There is another option to generation Cognitive Service API key. We can register a trial through https://azure.microsoft.com/en-in/services/cognitive-services/computer-vision/.


2. Create a Microsoft flow:-

a. Go to https://us.flow.microsoft.com/en-us/
b. Click on My flows and then Click on create from the blank.
c.  Select SharePoint and Select a Trigger “When a file is created in a Folder”.


d. Now Select Site Address and Folder Id. Here I am Selecting the Invoice folder.


e. Add a new step, Select Computer Vision and Select Action “Optical Character Recognition (OCR) to Text”.


f. Now Put Connection Name, Account Key (Generated previously in Azure) and Site URL and click on Create.


g.  Select “Image Content” as Image Source and “File Content” as Image Content.


h. Add a new step, Select Office 365 Outlook and Select Action “Send an email”.


i. Now add recipient of the email in “To”, Put File name as “Subject”, Detected Text as “Body”.

j.  Inside attachments put File name in “Attachments Name” and File Content in “Attachments Content”.

Now let’s test. I have uploaded an Invoice Image to my Invoice Document Library.


Now we can check the content of Image inside flow output.


Also, I have received an email of the Image content of uploaded Invoice Image.


Sources: -
 https://azure.microsoft.com/en-in/services/cognitive-services/
https://azure.microsoft.com/en-in/services/cognitive-services/computer-vision/
https://docs.microsoft.com/en-us/azure/cognitive-services/welcome
https://docs.microsoft.com/en-us/flow/get-started-logic-flow


 Thanks for reading the article. Hope this Article will helpful for you. Cheers!!!

Web Resource vs PCF vs Canvas App - which of the one is used?

While started working on specific Business Requirements related to custom layout, there is a always common question that "where to star...