Sam's Microsoft Dynamics 365 Blog

Wednesday, 27 February 2019

Migrate data Between CRM Instances Using Configuration Migration Tool

In this blog, we will learn about migrating configuration data between environments(instances). 


The Configuration Migration Tool works as follows: -


  •  Create Schema:-  Create  the schema file of source data.
  •  Export data :- Export data from source instance.
  •  Import data:- Import the exported data.


We can get Configuration Migration Tool from SDK.


We can find this tool inside sdk\ConfigMigration directory with name DataMigrationUtility.exe.


A. Create Schema :-

1.  Open the Configuration Migration Tool, below form appears allowing the user to select the desired action. For this example, we have specified “Create Schema” and selected Continue.


2. Enter login credentials.


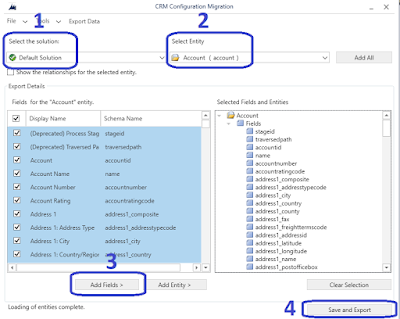
3. After logging in, the user is prompted to select a Solution and Entity.


4. Select the fields to be added to entity or select Add Entity to add all fields in the selected entity. We chose account entity. Items selected appear on the right and can be expanded as shown here.

5. Next, Select Save and Export.


B. Export Data :-

6. After saving the file, it will ask for exporting the data.
7. Select Yes.


8. After specifying the data file name and location select Export Data.


9. The progress of the file generation process will look like as shown in below screenshot.


C.  Import Data :-


10.  After completion of Export, we can import these data to any another environments(Instances).

11.  For importing data to another instance we have to select Import data option and then continue.


12. Enter login credentials.
13.  After logging in, we have to select an Exported data zip file(from stored location).
14.  Then Click on Continue.


15.  After Selecting the data file select Import Data.
 16. The progress of the file generation will look like as shown in below screenshot.


Tuesday, 23 October 2018

Display SharePoint Documents on Form in MS Dynamics CRM


Here’s an easy way to embed the SharePoint document window you’d normally get by navigating to “Documents” under related records, which includes all the native functionality like search, upload, 
This might fall under the area of semi/not supported but if it happens to break one day you won’t have invested too much.

You’ll need to create an iFrame for the SharePoint content, probably within it’s own tab. Remember what you name the iFrame as you’ll need to modify with that value. 

When configuring the iFrame...

On the General tab:

  • Restrict cross-frame scripting… to Unchecked
On the Formatting tab:
  • Number of Rows to 34
  • Scrolling to Never
  • Display Border to Unchecked
You could set the rows to a lower number, you’d just end up with a scrollbar despite the never scroll setting. 

Take this code and update the iFrame name and add it to the form. Call SetDocumentFrame during the form’s OnLoad event.


function SetDocumentiFrame() {

    try {
        // Get Subgrid URL
        var url = Xrm.Page.context.getClientUrl() +
            "/userdefined/areas.aspx?formid=ab44efca-df12-432e-a74a-83de61c3f3e9&inlineEdit=1&navItemName=Documents&oId=%7b" +
            Xrm.Page.data.entity.getId().replace("{", "").replace("}", "") + "%7d&oType=" +
            Xrm.Page.context.getQueryStringParameters().etc +
            "&pagemode=iframe&rof=true&security=852023&tabSet=areaSPDocuments&theme=Outlook15White";

        ///Append subgrid in Iframe
        Xrm.Page.getControl("IFRAME_SharePointDocuments").setSrc(url);
    }
    catch (err) {

    }


}


If you’re doing this, you might also consider turning on the option to auto-create SharePoint folders. Otherwise people are going to be getting prompted. You can find this under:

Settings => Document Management => Document Management Settings and then it’s on the 2nd page. 


With any luck, you’ll end up with something like this:


Wednesday, 3 October 2018

Display Image of Product in Dynamics Portal


In this blog, i am going to discuss about “Image” type attribute/field display in Dynamics Portal. Here we have an Image for a Product, we will display this image on Dynamics Portal.


I am creating a Web Template with name Display_image_Product.


Put below code in Source.

// Get Product Id from URL and assign it in pid
 {% assign pid = request.params['id'] %}
   {% fetchxml my_query %}
    <fetch version="1.0" mapping="logical">
    <entity name="product">
      <attribute name="name" />
      <attribute name="productid" />
      <attribute name="entityimage" />
      <attribute name="entityimage_url" />
<filter type="and">
<condition attribute="productid" value="{{ pid }}" uitype="product" operator="eq"/>
</filter>
     </entity>
  </fetch>
{% endfetchxml %}

 {% for result in my_query.results.entities %}
<img data-entityimage="{{ result.entityimage | join: ',' }}" />

<script type="text/javascript">

function toBase64(str) {
if (!str) return null;
var uarr = new Uint8Array(str.split(',').map(function (x) { return parseInt(x); }));
return btoa(String.fromCharCode.apply(null, uarr));
}

// Find any entity images and convert the byte string to base64
window.addEventListener('load', function () {
document.querySelectorAll('img[data-entityimage]').forEach(function (img) {
var data = img.dataset && img.dataset.entityimage;
var base64data = data ? toBase64(data) : null;
if (base64data) {
img.src = 'data:image/jpeg;base64,' + base64data;
}
});
});
</script>
          
 {% endfor %}


In above code it will get a Product Guid and will fetch its related image.


Here i have used in my Portal and it looks like:-


How to Get the Power Automate Flow Run URL Using Expressions

In many Power Automate projects, especially those involving approvals, error handling, or audit logs, it’s helpful to have a direct link to ...